I know how much all of you enjoy tutorials on how to DIY, so I figured I would recap the building of our quilt boxes that Michelle and I made. Make sure you read the entire blog before cutting your wood if you plan to use this as a guide. WARNING: I give the actual dimensions of the pieces we cut. I learned a little bit along the way, which I share at the end, and it might change the dimensions you actually use on your box frame. Let’s get started.
Materials and Tools List I Used (after I was done screwing up):
1x pilot-hole drill bit
1x drill
1x wood drill bit of 3/4 inch diameter (for drilling ventilation holes)
1x nailing hammer (not cross peen, not ball peen, not flatter, etc.)
1x Construction Stapler
1x box of staples no longer than the thickness of your scrap wood (don’t want the ends to stick out and poke you!)
2x (per quilt box) piece of 5/8 inch scrap wood cut to the dimensions 16 1/4” x 4 1/2”
2x (per quilt box) piece of 5/8 inch scrap wood cut to the dimensions 19 1/8” x 4 1/2”
8x (per quilt box) 1 1/4-inch ring shank nails (longer if you use thicker scrap wood)
1x piece of hardware cloth cut to the internal dimensions of the quilt box plus 1 inch.
For example: if your internal width is 18 inches and your internal length is 15 inches, you want the hardware cloth to be 19 inches by 16 inches.
1x piece of breathable material cut to the internal dimensions of your quilt box (we used gardening cloth)
1x package of absorbent material that isn’t toxic to bees (we used paper bedding for small animals)
The first thing we did was found some old wood lying around the house, to build the quilt boxes out of. It doesn’t have to be any particular kind of wood, just something that is going to hold up for the winter. In our case, we used 5/8 inch plywood that we had left over from siding our woodshed this summer. To figure out the dimensions we needed, we simply measured the outside diameter of one of our spare supers. As all of the boxes should be relatively the same outside diameter, we figured this would be sufficient and wouldn’t need to measure each hive specifically. Once we figured out the dimensions and cut the appropriate lengths/widths of boards from our piece of scrap wood, we went to the assembly of the quilt box frame.
Assembly ended up causing us a little problem in the beginning. I had initially thought that screws would be better at holding the wood together. After trying a few of the screws I had on hand, though, it became immediately apparent that they would be much too big and long for this application using this particular wood (it split the layers in the plywood). I then pulled out some 1 1/4 inch ring shank nails I had left over from the same siding project from this summer. The first one split the plywood apart. I then decided to drill a pilot hole slightly smaller than the nail and it worked perfectly. The ring shank nails are great to use because the ribbed nail shank has a tendency to stick in the wood better than a smooth shank nail would. We also had to decide whether we wanted the long sides to cap the short sides or the short sides to cap the long sides (we went with short sides capping long sides). Depending on how you measured your side pieces, you should choose the way that will best fit the outer cover that is going to go over the quilt box. At any rate, we got them all nailed together. Once they were all nailed together, Michelle and I decided to use the 3/4 inch wood bit that we had to make the ventilation holes. We ended up putting the holes in the front and back of the hive because of the direction the wind usually comes from here in Oregon and the orientation of our hives. There is no reason I can think of that someone wouldn’t put a couple holes on every side or just two on each side and none on the front and back. Anyway, we put the center of the hole about 1 1/8 inch from the top of the frame. In retrospect, I probably would’ve gone 1 1/2 to 2 inches because as they now sit the outer cover partially blocks the ventilation holes so be sure to measure how far down they need to be so they won’t get blocked. We then took them inside to start fitting the hardware cloth to the boxes.


Again, we relied on knowing that all of the boxes were roughly the same dimensions. We purchased some 1/4 inch hardware cloth from Wilco to use as the sturdy shelf on which to put the absorbent material. Any wire will work for this project; it just has to be sturdy enough to hold the weight of the absorbent material you put on top of it without sagging. Last year, I used some of Michelle’s laundry bags (loose netting material) to hold up the wood shavings I put on top of it. The flimsy nature of the material made it an adventure to try and perch the wood shavings precariously on top of it, which is why I went with hardware cloth this year. I really like the usefulness of hardware cloth and rely on it heavily when doing projects for our various creatures around the property. When you cut the hardware cloth to bend up the sides (so you have something to staple in place) you will want to cut a 1x1inch square piece from each corner of the hardware cloth. The dimensions of the piece you cut out of the corner will vary depending on how accurate you were in measuring the internal dimensions of the box frame and how accurate you were in cutting the hardware cloth. Once you cut the corners out, you can start bending up that extra inch you added to the dimensions to create a box shape. We used the edge of the box frame as a guide to bend the sides up. Once you have the sides bent up, the cloth is ready to be pushed into the box frame and stapled. We decided to make all of our hardware cloth screens, and then take everything outside to staple all of them in place. Make sure you keep the squares you cut out of the hardware cloth corners. You can use this scrap to cover up the ventilation holes when we staple the wire into the frame. Depending on the size of the holes on your hardware cloth (or whatever you choose to use), you may or may not want to put an additional layer of material on top of the wire to hold the absorbent material up.
")


If you use the same absorbent material we did, you will want to cover the wire with a breathable material which won’t let the absorbent material fall through it. We used that gardening cloth that people use to keep the weeds down. It is breathable and non-toxic, so I figured it would be safe to use. You could also use a tightly weaved burlap or canvas. I would bet an old T-shirt would probably suffice, as well. Whatever you choose, it needs to cover up the hardware cloth, so cut it to the internal dimensions of your quilt box frame or as close as you can get to it. Remember that the internal dimensions will change with the thickness of the scrap wood you use, but the external dimensions will not change. So now we have all of the pieces we need to construct our quilt box.
We took all of the parts out to the shop to put them together. First, we pushed the hardware cloth (shaped like a box) down into the box frame.
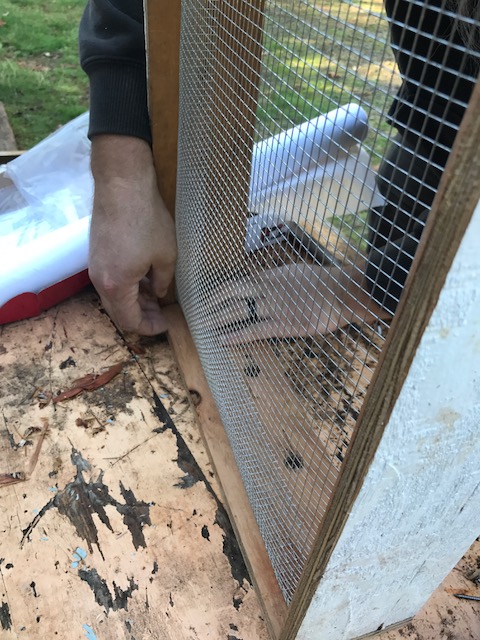
We tried to place the bottom of the wire about an inch up from the bottom of the quilt box frame. This space would allow us to put our Sweet B fondant under it without having issues. Once in place, I stapled each corner and stapled a couple places along each side. This ensured that the wire would remain stable no matter how much material was stacked on top of it. Next, I took those scrap pieces of hardware cloth that we cut out of the corners of our larger pieces and stapled them over the ventilation holes.

This will keep any curious creatures from wandering into the warm top of the hive and making a winter home (like mice and birds). Once everything was stapled in place, Michelle and I took the gardening cloth that we had cut to the internal dimensions (actually we cut it way too big…but we used it anyway) and laid it over the hardware cloth.

If it is too big, make sure you fold over the sides so they don’t block the ventilation holes. Now we have something that will keep the absorbent material from falling into the hive, so we put the absorbent material on top of the gardening cloth. For this part, we again went to Wilco and looked for wood shavings. I figured this would be a problem many people have solved before, but for a different reason, so I was sure there would be something I could use. As we perused the various isles of pet and livestock-related paraphernalia, we found a bag of absorbent bedding for small animals. Perfect. It was also super cheap and biodegradable (paper) if that matters to you. Remember that this is just shredded and crumpled up paper.

You could just as easily go grab a stack of newspaper (the non-coated kind) and shred it for your quilt box or use wood shavings that aren’t bad for bees. We filled the quilt box with this material up to the bottom of the ventilation holes (about 1.5 inches).


The way this is supposed to work is: bees breathe -> hot moist air rises -> hot moist air condenses on the cold outer cover -> condensed water rains down and is absorbed by material in quilt box -> air blowing through ventilation holes evaporates water and carries it away. I included a few pictures of the installation for your enjoyment.


Now, on to what I would do differently. The first thing that comes to mind is that I would make the quilt box 5 or 6 inches tall. This would leave more room for fondant underneath it, bigger ventilation holes, give more wiggle room for ventilation hole placement, and a thicker absorbent material layer. Second, I would make my ventilation holes lower. They are currently partially blocked by the outer cover, so we aren’t running at peak efficiency. Third, I would make the outside dimensions of my quilt box about 1/16 to 1/8 inch smaller than I did. We ended up having a REALLY tight fit when we put the outer covers on the quilt boxes. One of the hives required a hive tool to pry the cover onto the quilt box…but that was just one of them. I may take the router to that one later. Other than that, they are working as I intended. I will give some updates later on in the winter to tell you how they are actually performing in keeping the moisture out of the hive.
I hope everyone enjoyed this tutorial. If this is the kind of thing you want to see here, let me know in the comments. Don’t worry, blacksmithing folks. I plan to do a few videos this winter on how to do some simple projects in your small home forge. I’ll even throw in some videos and pictures of the “axel to gladius” project that Waterboard and I have had in a state of “half-done” for about six months. For now, have a great day and keep those bees dry!
