I have been kind of a lazy butt since I got out of the Army. I play video games, ride my Harley, watch TV. You know L-A-Z-Y! All of that has changed since Michelle and I moved into this house.
The first thing we did was rip up that old carpet, you know, the one from the 70’s. It was the sort of camo pattern shag carpet with yellow, orange, and brown in it. I’m sure at some point it was the style, but not in my bedroom. As we started to pull up the carpet, we noticed that we had some nice looking wood flooring under it. Evidently, the owner had, at some point, decided to cover up this beautiful old growth fir floor with that stylish carpeting. I had already put a deposit on new bamboo wood flooring for the whole upstairs, but it was refundable so I was happy to save roughly five thousand dollars on the remodel. The living room and other bedrooms weren’t quite as bad with their carpet choice, but we still ripped it all up. The whole upstairs was covered in that old growth fir! We spent a couple of days, with help from our friends and my kids, pulling up carpet and nails. It needs a finish soon, but it looks really nice and I love the history that I learned from looking up what the builders were doing in 1947 with regard to wood floors.
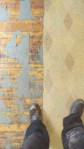
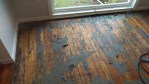
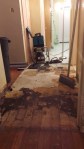
Here is before and after in the dining room:
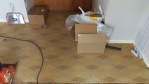

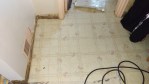
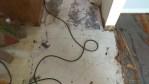
Here are a few pictures of the kitchen floor progress:

At the same time as we were starting to rip up the carpet, we were really not into some of the kitchen nuances. The walls were covered with a very high quality wall paper which was more like fabric, but the pattern was fruit and flowers. The trim and the doors in there were painted pink, there were multiple layers of linoleum lining the floor, and the ceiling had these daisy chained shop lights (i.e. halogen) which were covered by a drop ceiling. The first night, we tore down the drop ceiling which immediately made the kitchen feel much bigger. At six foot two with a son who is six foot four, I can’t have a room in my house that makes me feel like I need to duck. After the drop ceiling was ripped down, I didn’t. We eventually painted the walls a gray/beige color and the trim white. We still plan to paint all of the doors or strip them to bare wood and stain them. I would just replace them, but they have the original hardware, complete with skeleton key holes, from the 1940’s/50’s and I want to keep the “old farmhouse” feel, so I don’t want to modernize anything I don’t have to (the avocado colored dual oven will have to go, though).
As we were taking up the carpet, we discovered this really cool retro linoleum in the dining room. It was orange and brown diamond shapes. I thought it was reminiscent of an old 50’s diner, but Michelle was not impressed so I had to tear it up. The longest project we have worked on so far was removing the linoleum in the dining room and kitchen to expose the wood floors. The dining room was relatively easy. We got the linoleum pulled up and exposed the tar paper, then used a wall paper steamer to get the glue and tar paper liquefied and scraped it up with a scraper then finished off with a mop. The kitchen, however, was a different story. There were three layers of linoleum, a layer of thin press board with linoleum adhered to it, and it was finished off with a layer of tar paper. The top layers of linoleum were easy enough to remove as they were just glued to the press board. That press board and tar paper, however, were very difficult (to say the least). The wood underneath has never been finished and is raw wood. That has caused the situation where, over the years, the tar paper has turned to glue and adhered itself to the fibers of the wood. Furthermore, the press board was nailed AND screwed into the wood. It took us over a month of using a wall paper steamer, which we rented from Home Depot, to steam the little bit of linoleum into a more flexible state, the press board into a pile of glue and sawdust, and the tar paper into a more scrapable state. I would then use a floor scraper to pry up the multiple layers and pull it off…one 1 ft. X 2 ft. square at a time. After that was all done, there was still a significant amount of tar paper left on the floor, so Michelle went back over it with the steamer and used a hand scraper to get the remaining tar paper up. It was extremely labor intensive, but now the floors are ready for sanding and finishing.
Lastly, we installed internet access points in each room, and painted. All are pretty much done except for the main bedroom and the computer room. This house has very beautiful coved ceilings and archways and we wanted a way to create a visual separation between the wall and the ceiling so we could paint them a different color. We chose to use chair railing along the top of the wall just before the cove started to create that separation. It was, obviously, Michelle’s idea as my home decorating abilities are not exactly stellar. It ended up being a very nice transition point and fairly simple to install. The internet was a full day project, but I think it fills the needs I have as a software engineer, without having to have cables running through doorways and looking like a mess. I bought a 24 port switch, which I installed in the hall closet along with the wireless router, then bought 1000 feet of Cat6 cable and ran it through the attic into the walls. I ended up with a very high speed network running throughout the entire house without degrading the old look. Additionally, as the phone industry moves more and more toward VOIP and the fact that I haven’t had a land line in ten years, I was able to remove the old phone cables and boxes which were running along the baseboards and installed in a very unattractive manner. I was pretty pleased with the result.
Here is what it looked like in the top of the closet when I was working on it:

The basement is another project, but I will save that post for another time. I’ll post some pictures of the different stages when I get home to give you some perspective of how it did look versus how it looks now.
